

When you first move into a new house, there are usually a few things you have already deemed absolutely unbearable. As in, “This hideous monstrosity is THE very first thing we are going to replace!” But then this strange thing happens. Someone needs braces or baseball cleats or food, and suddenly, the once-embarrassing chandelier takes on a certain “Je ne sais quoi” and those counter tops feel sort of…”retro-hip” instead of outdated.
Fast forward 14 years and I suddenly decided I could not take the outdated laminate wood grain counter tops another second. And so I’ve spent the past few months perusing all of the various DIY Counter top Remodel Projects on Pinterest trying to decide which would be the cheapest and easiest. (Read: which one I could manage by myself and eff up the LEAST.) Ultimately I ended up taking tips and ideas from a few different sources, coming up with my own tutorial, and deciding, “What’s the worst that could happen?” If I truly RUIN them, then I guess I’ll have to fully replace them. Which I wanted to do anyway. Fourteen years ago. So it would almost be like Plan A is actually working out, instead of Plan B getting all screwed up. And then suddenly I loved my idea even more.
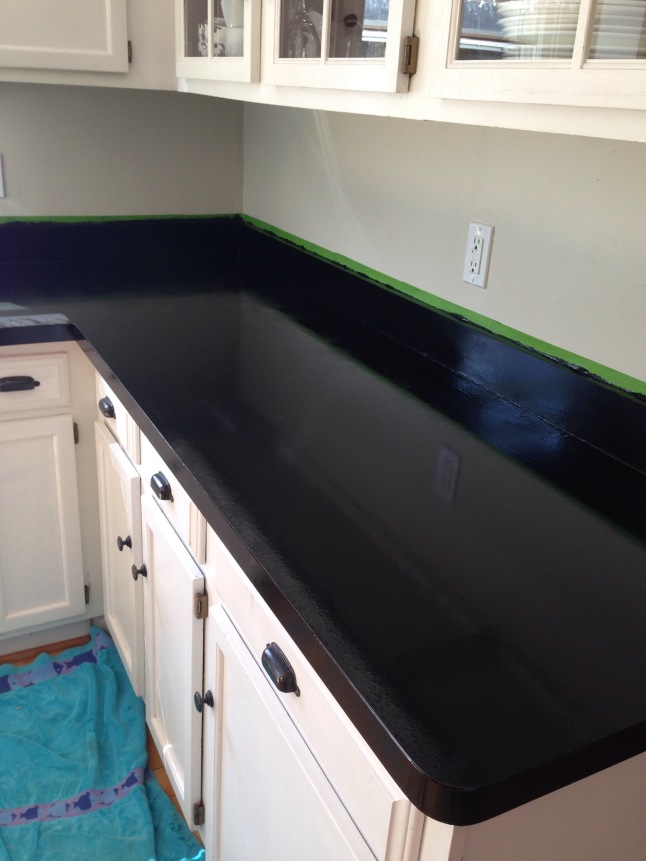
The big makeover day arrived. I’m not big into the whole “preparation stage” of painting. I taped off a few sections of wall and stuff I thought I could possibly ruin if I got sloppy, threw a towel on the floor as a makeshift drop cloth and got to it.
Step One: Using a foam roller, paint the counter tops black.
This part was super easy and super scary. Because once you start, this is really it. You’re really doing it. You’re REALLY painting your counter tops black. And it’s even scarier when you realize that, in your haste of 14 years, you grabbed a can of enamel paint instead of latex. Enamel paint doesn’t quite clean up the way latex paint does. Do not ask me all the reasons I know this.
Okay. Um. Well. That’s okay. I’ll just be extra careful, I promised myself. And I will wipe up any drips or spills IMMEDIATELY, understanding they are sort of permanent. And I will definitely keep this beach towel under my work space at all times. Pretty much.
There was no need to worry. The black turned out beautiful. And no one will ever really see the few drips on the floor here and there. I’m sure they will “buff out” eventually.
Step Two: When the counter tops are completely dry (or you feel impatient and in a hurry) begin the “marbling” process. Choose 2 or 3 colors that you will “sponge” on top of the black, allowing each color to dry in between. Or, you may also question, “Why do they have to dry in between? Why can’t I just do each color on top of the other, while wet?”
Well, you can. Yes, you can do that. And when “Safety 3rd” is your life’s motto, it turns out that IS exactly what you do.
It worked. I picked a few colors (taupe, white, grey) and got started. I used a professional combination of natural sponge, plastic grocery bag, and crumpled up paper towel. In the biz, they call this, “innovation” and it is a highly admirable trait. Then, because I was feeling like kind of a big deal, I used an old toothbrush and lightly flicked gold speckles all over. Everything. Everywhere. Oh well. It’s hard to be precise with a tool like that.
I was loving this! It was turning out better than I thought!
Step Three: When the counter tops are COMPLETELY dry, polyurethane the hell out of them. Because you are always in a hurry, shake the can vigorously, pour it in the tray, and get rolling.
Just as I did not completely follow any ONE tutorial, I do not recommend you follow mine to the letter, either. I hit my first big snafu at Step Three. When I started rolling on the polyurethane, there were air bubbles. Lots and lots and lots of tiny little air bubbles. I tried to convince myself in my best Mary Poppins voice that everything was going to be okay and these would go away on their own. Surely they would DRY smooth. Then I left the house in my state of polyurethane-induced delirium. They did not dry smooth. When I returned with a clear head, the air bubbles were still there. Shoot.
Step Four: Read the directions on the polyurethane can and learn that you must NEVER shake polyurethane. It causes tiny little air bubbles in the finish. Whatever.
Step Five: Buy a new can of polyurethane.
Step Six: Lightly sand the air bubbles. Start over with the new unshaken polyurethane.
Step Seven: When you STILL see air bubbles, curse loudly. And repeatedly. In different languages.
Step Eight: Decide on a “texturized” finish. Which is really more durable anyway.
Step Nine: Add approximately 50 more coats (or 3). Open every window and door. Leave your home indefinitely because the air is completely toxic and not fit for life.
Step Ten: When you return home, admire your work. You are a Rock Star.

A few days later, when my girls returned home from vacation, they couldn’t believe the counter tops. They loved the update and how well everything turned out. At one point, however, the youngest ran her hand over them and gave me a slightly suspicious look. “Why are they kind of rough?”
I smiled. “They’re texturized. Don’t you love it?”
This morning as I crept downstairs to make my coffee, I set my favorite mug on my shiny, texturized new counter top. For a split second, I thought, “Oh. Wait. What if it leaves a mark, or a ring? What happens if these get scratched or ruined somehow?”
And then my brain made the type of jump it always seems to. I see metaphors for life everywhere– and the counter top project was no different. If they get ruined somehow, or do not hold up, I will paint over. I will re-roll. Re-sponge. Do a little sanding. I’ll replace them if I have to. You can’t really ruin them. We will fully use them. I’m not going to be scared or crazy about ruining the finish. Everything is fixable. I was scared to start this project, but it’s the best thing that’s ever happened to my kitchen. I can’t believe I lived with that ugly wood grain laminate for so long.
When I bought that new can of polyurethane, the guy at the hardware store and I were chatting. I smiled and laughed and said, “I don’t really know what I’m doing.” He smiled back and said, “Nobody really does.”
And yet look. Everything turned out beautiful.
{If you’re seriously looking for more detailed instructions on how to paint your counter tops, please see any number of pins on my Pinterest Board, Paint it Like a Boss. Although I can’t imagine you needing better directions than this.}

Absolutely love it!!! Now do mine!!!
LikeLiked by 1 person
Looks terrific – GREAT Job
LikeLike
Awwwww come on Colleen! Look how easy I made it sound! You can do it!! 🙂
LikeLike